|
|
How are we figuring out what goes where? In most KAP applications, the camera is pointed at the horizon, or slightly towards the ground from the horizon. It’s pretty easy to get landmarks this way (trees, buildings, roads, stuff like that). Looking at the ground, however, it’s not so easy. How do you get good landmarks in a sea of green?
Simple. Ground markers.

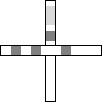
It’s really a pretty simple marker. Made from 2 pieces of meter-long wood (it’s several centimeters wide, but I don’t recall off the top of my head.) The boards are painted a flat white, North is painted red (lighter grey in the above image). The stripes are painted flat black (darker grey in the image). The boards are drilled through the center and affixed with a bolt and wing nut, to easily collapse them for storage and transport. Red is painted on the edge of the east-west board facing north, to keep it keyed when unfolding.
Download a PDF with 20 ground markers already made
Download the GIMP source file for the ground markers
Kite Aerial Photography is not going well. Friday the 13th was a particularly bad day.
MORNING: In the morning Josh, Julie & I drove to NNWLF. We set out ground markers and got the kite up. After we got the camera up we realized that the remote control wasn’t going to gain us much with the canon S70 because it take about 10 seconds between shots in the RAW mode. The interval on the timer is about 15 seconds. Then the camera battery ran out ARG. So, we went back to lunch.
AFTERNOON: Armed with fresh batteries we went back to NWLF and set out the ground markers, got the camera up, and took a lot of shots. Or so we thought. When we returned I found that there were no photos on the card. We’re not sure what happened. Perhaps the LED didn’t trigger the sensor. The problem was we didn’t check. ARG.
EVENING: Julie & Josh painted the kite line at 10 meter interval, so we could gauge the height of the camera. When the paint dried, I went out the roll up the string and found it was in four pieces. Some animal had chew through the line in several places. ARG.
Well, we are learning a lot. We have a long way to go before we are a well-oiled KAP machine.
Of course there was a fine finish to the day. I was working on the computer and got distracted for a few minutes. Then I heard thunder in the distance and the power went off for a few seconds. I lost the first version of this lament. I then pulled the plug on all computers and went to bed.
Here’s a rundown of our equipment and various settings that we’re using.
Kites:
Sutton Flowform 16
G-kites Dopero
Peter Lynn Pilot 50
Other kite bits:
Horizontal Brooxes AutoKAP Kit
A plastic winding halo
200 and 250 lb test string
Cameras and accessories:
Canon S70
Canon EOS 400D / Digital Rebel XTi
Canon 50mm f/1.8 prime lens, aka the Nifty Fifty
GentLED infrared LEDs for setting off the camera by remote
Tower Hobbies RC FM transmitter and receiver
Software:
the GIMP (Free image manipulation)
UFRAW (includes a GIMP plugin for reading RAW images)
General camera settings:
Manual focus, set to infinity
Tv mode (shutter priority) set to 1/800 or 1/1000
RAW mode (RAW+640×480 on the S70, RAW on the XTi)
ISO 100 (200 or 400 if it’s not sunny, though noise can sneak in at ISO higher than 400)
Bracketed down 1/3 stop
Zoomed out as much as possible (50mm on the XTi [doesn’t zoom anyway, as it’s a prime lens), ~28mm on the S70)
Remote-driven mode
Other bits:
Wooden ground markers (details soon, including images)
Paint
It was Friday the 13th, the kind of day the superstitious worry about and the kind that I figure is just another day. The wind was pretty good, enough to pick up our Flowform 16 kite with our camera rig. We went out to North by Northwest of Landfill and set out our ground markers [images when our internet gets back up]. With a pretty good wind from the west, we got the kite up and the camera rig above the roadside population. We took two runs along the road, once south and once north (higher and lower). Overall, it was a good run.
Until…
Until we plugged the camera into the computer. No images. Hrm.
We were using a new setup that day. Stuart had bought a radio-control set that we hooked up to the camera. It seemed to work just fine at the farmhouse… but not at the site. At this point, Julie and I were painting the kite string (so we could tell how much line was let out). Testing the RC stuff again, it SHOULD have worked fine. We’re not sure why it didn’t.
Cut to the next day. We left the string out to dry when we left in the evening and between our departure and Stuart’s taking the line in a few hours later, some cheeky rodent decided that our artificial string would be a tasty snack and gnawed through it in a few places. Friday the 13th strikes again.
And now today. The 200-lb test line has been painted and is currently drying. I’ve worked out one of the problems with our camera rig (before, the camera would take a picture all the time: all that was needed was putting it on a different control stick. [images for clarity later]). I can now control both the Canon S70 and the new Canon Digital Rebel XTi (with The Nifty Fifty, a 50mm prime lens. It’s a touch long, but our benefit in megapixels and in general quality should be worth it) with the press of a control stick.
… are boring.
I took about 118 photos this afternoon and the > 100 straight-down shots are not interesting. Straight-down shot will provide good data when we have the ground markers and get enough shots in the right places. But for visual appeal & interest, the photos are boring.
Flying the kite was fun. It was cloudy with 10 – 15 mph winds from the N – NNW. It was a challenge to get the FF16 kite up–a 15 minute ordeal. But when it got up, it stayed. It was tiring to take it down and then it easily went right back up again. I took shots of the CG and then went to Staffanson.
Here’s one of the few shots with the camera tilted. I like it.

This is a view of part of the common garden from the West. The rows are 1 m apart and those things are tripods for the video cameras. The tripods weren’t in use today and have plastics bags over them. Flags are more visible than the Echinacea plants. But If you click on the thumbnail, you’ll be able to see some flowering plants in the larger image.
Overall, today went pretty well. We managed to get the camera up on the small kite. 
The wind gave us a few problems, though. The camera came down a few times and we had to run to grab it. 
The big kite, however, had issues. After letting it out around 80 meters, the kite took a dive to the right… into a building. WHAM. This isn’t a sound you want to hear. A few tears on the front, but not horrible. The problem came when Stuart was moving the kite. A gust of wind caught the kite around him. SNAP. Another bad sound. The carbon-fiber sticks were fine; an aluminum connector was not.
Here are some key resources:
Kensington general forecast and 48-hour surface wind forecast (from NWS in Minneapolis).
Hoffman general forecast and 48-hour surface wind forecast (from NWS in Grand Forks).
Current conditions at nearby weather stations.
We have finished two weeks of the summer field season and I feel like we haven’t settled into a routine because we have been doing something new and different each day. It’s exciting.
Here’s a recap of accomplishments this past week…
Last week we finished searching for plants in the recruitment experiment. One plant (of ~1000 still alive) is flowering this year; it’s the first plant in the experiment to flower! The plant germinated in spring 2001.
Our high tech endeavors are underway and we have computer infrastructure to support them. Josh has networked the computers, hard drives, and printer. After some anxiety-inducing modifications to the video camera power supplies, we started taking video of pollinators & other visitors of Echinacea heads. Andy previewed a video this morning and it looks great! We still need to get more reliable power sources, but video cameras sure beat sitting on a bucket.
Colin has developed a camera rig to take shots of Echinacea heads in the common garden. We will be able to quantify many aspects of radial symmetry in the heads with the resulting digital images.
We assessed herbivory of ray florets in the common garden. We also looked at damage to disc florets. Jameson began to classify types of damage, but there weren’t that many heads with damage to the disk florets.
The KAP team (Julie, Rachel, and Josh) has made progress. Wind conditions have kept the kites on the ground most days, but they are making ground markers and have prepared the camera and rig. I flew the Sutton FlowForm 16 today in 12-16 mph surface winds at the park in Hoffman. Wow, it can pull. Yesterday, Gretel & I flew the G-Kites Dopero in somewhat variable winds. It was nervewracking.
The Bee team (Amy, Ian, Jameson, & Gretel) has abandoned my (bad) idea of watching bees through binoculars in favor of their much better idea. They are marking Agapostemon virescens individuals with acrylic paint and watching them when they are on the heads. They marked two bees on Friday and saw one on Saturday. Cool. They also have a slick form for entering observations.
We all have been making systematic observations of flowering phenology and style persistence of all plants in the common garden and along a transect at Staffanson Prairie Preserve.
In case anyone was wondering about the ostensibly narcissistic streak in recent posts, I _asked_ everyone on the team to post a profile with a photo.
Good work team Echinacea! We are making great progress in our quest to gain greater understanding of the ecology and evolution of plants and insects in fragmented prairie habitat.
Turns out, our camera wasn’t saving settings properly. That’s lame. I got it to work and have some slightly modified settings from Julie’s post. Here’s the rundown.
Tv mode (shutter priority)
1/1000sec shutter speed
100 ISO
focus on infinity
zoomed all the way out (shortest length, equivalent to 28mm?)
We’ve been shooting in RAW format. The GIMP + ufRAW takes care of previewing and opening the RAW files. A thing to note is that the camera’s white balance is totally off (it has a purple cast to everything) so we set white balance to Daylight mode.
We’ve also marked the string in 10m increments up to 50m, though maybe there should be more. We’ll see.
As far as lining up all the pictures, we’ll be making 1m crosses painted white and keyed with black stripes. This should allow us to have both a sense of how large the space is and the orientation of the image. This way, we ought to be able to piece everything together.
This afternoon for work, a kite was flown. Now, this was not just any kite. This kite had a name that involved “16”, as that presumably is roughly the square footage of this beast. Being a gusty afternoon (Rachel clocked the wind speeds at anywhere from 7 to 27 mph). Having trouble getting the kite up by just letting the gusts grab it, I went to the house to grab a few more pairs of gloves (didn’t want rope burn). As I returned, Rachel and Julie figured out the trick to get the kite up: run with it.
In fact, two people run with it. One holds the kite, the other the spool. They both run into the wind. At the right time (during a gust, most likely) the kite-holder lets go and the spool-holder keeps going. This will launch the kite high into the air. It’s interesting to note that the kite pulls back. Hard. We didn’t hook up the camera apparatus, though; our kite-flying skills are not yet honed (we’re not well-oiled enough, probably) and we didn’t want to break an expensive camera. The kite came down hard, incidentally.
Taking the kite down is a three-person job, ideally. One person spools the string (vertically! horizontally it twists, shortening the life of said string) while another pulls the kite down by the string. The third person is between them, feeding the slack to the spooler and preventing the kite from slipping back up while the puller is, ah, pulling. We had gardening gloves on to prevent rope burn. Effective in preventing rope-burn, ineffective in actually holding onto the damn string. We could really use gloves with rubber grips.
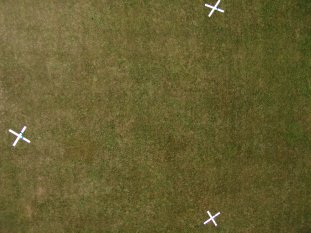
The final step is the actual photography part. Once we’re good at flying the kite (Stuart says some call it “poor-man’s sailing), we’ll send up the victim camera to take our aerial photos. We tested the camera at various distances from the side of the storage building (looking for an echinacea-sized X of tape). At 40m (lower than our flying height, I fear), the tape was indistinguishable from the building. It may have been the settings, it may have been the shaded lighting, and it may have been the camera’s tiny screen. We can’t say until they’re on a computer (not easy, as the card reader seems to have failed). While I’m not worried that the camera’s 7.1MP resolution will be too small to discern detail, my concern is that the optics on the camera are simply not good enough to resolve something the size of flower-heads. The camera is a semi-compact camera; ideally, we’d have a good dSLR (Canon Digital Rebel XT[i] or Nikon d40[x]) with a high-quality and fast lens. This is expensive, though, and quite a bit heavier.
Anyway, since the images need to be meshed into a giant map-type image (we’re like Google Earth, only without the satellites), there needs to be a way to have consistent landmarks in the fields we plan on photographing. This is where the painted wooden sticks come in. We’d (preferably) put flat, white-painted pieces of wood on stakes and place them in the field as markers to line up the images later. The final plans for this have yet to be made.
For now, though, we need to consistently get the kite into the air and onto the ground safely before taking pictures. We’ll see how this goes.
|
|


