|
|
Howdy all you Flog Followers,
I have returned from summer break and feel more ready than ever to dive back into the Extremes Project!
Once all the achenes were randomized, I moved on to the next step: X-Raying all of the achenes.
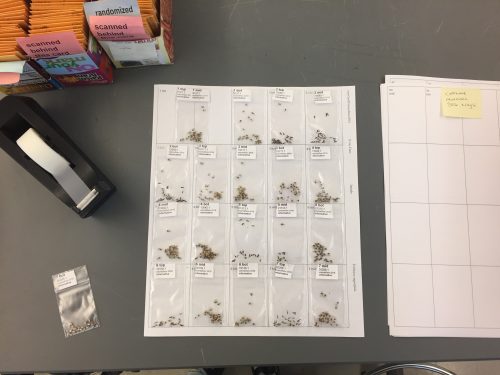
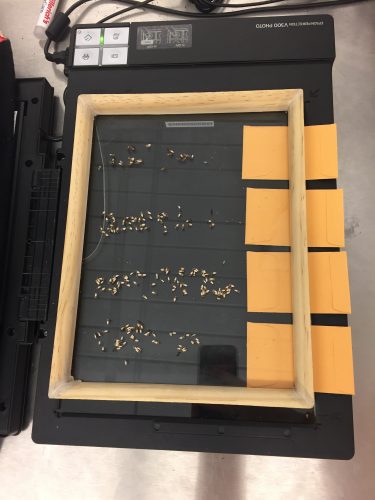
First, I put all of the informative achenes, in the clear plastic bags, onto a gridded sheet. On the sheet, the achenes are placed in numerical order. This keeps the x-ray process fast and easy to follow.
Image 1:

Next, I took all of the sheets into the lab room with the X-ray machine and computer.
Process for one scan (one scan = one sheet of paper, as seen in Image 1):
- Uncover and Turn on the X-ray machine, Scanner, and Computer and ensure that they are all set up properly.
- Block off the red lights that create a grid of lines within the x-ray machine. This is to avoid any visual obstructions. I used sticky notes (easily removable).
- Put the sheet of achenes and the film sheet (the Echinacea Project team has a personal, newer sheet to use!) into the x-ray machine, make sure to line up properly within the tape marks on the bottom of the machine and close the door completely.
- Run the x-ray by pressing the appropriate buttons on the computer.
- After a handful of seconds (I believe 15 seconds) the x-ray is complete.
- Next, move onto the Scanning Machine.
- Remove the film sheet from the x-ray machine and put it into the scanner. To initiate the scan, film sheet will require some accurate alignment and positioning into the machine.
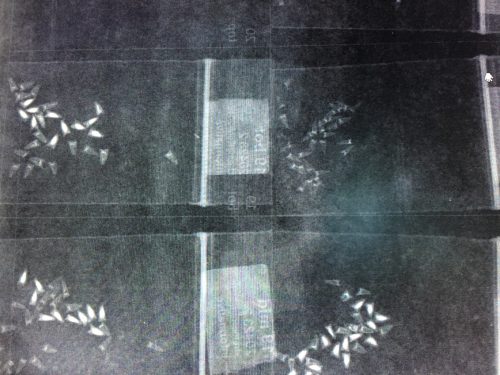
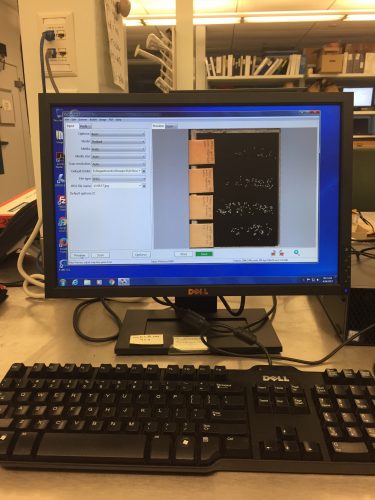
- Once complete, the scan will show up on the computer! The scan will look similar to Image 2.
- It’s key to check the quality of the x-ray, if achenes are too difficult to see a new x-ray should be performed.
- Crucial!! Be sure to save each x-ray to the appropriate folder !!
- Before leaving, make sure to remove the sticky notes, power off all of the machines, and put the covers back onto the machines. Essentially, leave the space as you found it, or cleaner!
Image 2:

In this image there are four separate bags of achenes. Even within these four bags there is a large difference to the number of seeds found in each bag. Of the cluster of achenes on the bottom right, the majority of those achenes are full with seeds (the opaque white filling). However, directly above on the top right, all of the achenes are empty.
I am excited to see all of the variation amongst this seed set and will be moving onto analysis in the next few weeks!
Till next time folks,
Nicolette McManus
Howdy Flog Followers,
After the scanning is completed and all of the achenes have been counted, the next process is randomizing.
Randomizing consists of taking the top, middle, and bottom sections of achenes and separating their achenes into an informative and uninformative subcategory. The goal of this step is to get a random, and therefore representative, sample of achenes from the middle.
For the informative subcategory, the goal is to place 30 achenes from the top, middle, and bottom section into clear envelopes. The top and bottom achene sections normally have 30 achenes already within their section, due to the extraction method used that aimed to get 30 achenes from the top and bottom before moving on to the middle. So, in exchange the middle section of achenes normally has a larger number of achenes. In order to narrow the large sections of achenes down to 30, randomization is necessary.
Steps for randomizing:
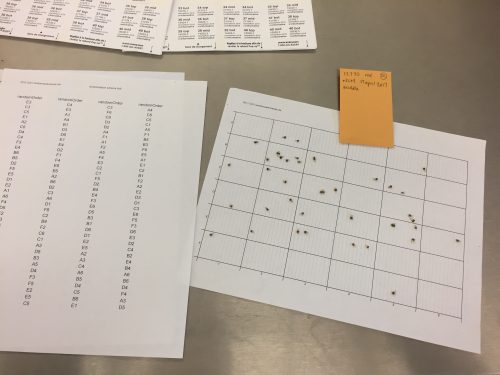
- Pour the section of achenes across a sheet with a labeled grid.
- Make sure that all of the achenes are clearly within a box of the grid. Go through and push all the achenes that landed on the lines and outside the grid space into a distinct box. This is to avoid bias.
- Follow the list of randomized letters and numbers, provided on a separate sheet of paper, until you have accumulated 30 informative achenes.
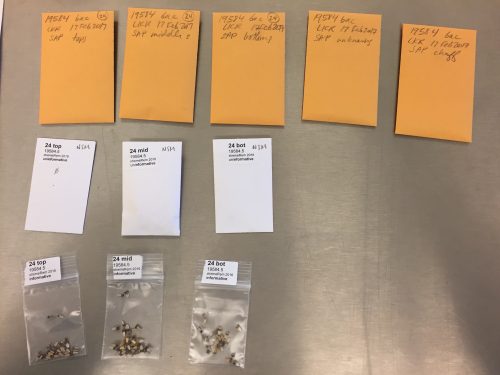
All of the remaining achenes from randomization that were not chosen are put into the uninformative subcategory. Ray achenes, achenes with holes, and achenes that have been crushed along the way are considered uninformative. These are placed in small white paper envelopes.
After the achenes are separated into their informative and uninformative subcategories, they must be labeled with their corresponding sticker. This is so that their identification, and therefore the extreme quality that the seed-head possesses, is not lost.
Seen in the image directly below is The Final Product: 11 envelopes. 3 of these envelopes are the clear bags full of the informative achenes, from the top, middle, and bottom sections, that will move on to be X-rayed. The use of clear bags is for X-ray purposes, so that a clear shot of the achenes is achieved.
‘Till next time folks,
Nicolette McManus
Howdy Flog Followers,
After cleaning a whole bunch of seed-heads, I began the process of scanning.
Scanning is a rather simple process. Out of the 5 achene envelopes for each seed-head, the four envelopes containing achenes (excluding the chaff) are used. Each section is poured out onto a glass ‘sheet’, that is placed onto the scanner. I loaded each section with its corresponding label from the paper envelope, for identification and to avoid confusion between the different sections. In the image below, from the bottom to the top of the glass sheet the achene sections : top, middle, bottom, other. The middle section is the most noticeable, as it normally has the largest number of achenes.
After all the achenes are placed onto the glass sheet, a cover is placed over the sheet, for the sake of darkness. Then the scanning can commence! Each resulting scan looks similar to the second image, on the computer screen.
Lastly, it is important to have a specific place to save all of the scans to. I have saved all of the extreme scans to the ‘EchinaceaCG2016’ Folder, under the I Drive. This way, everyone (including yourself) will be able to find your hard work.
 
The scanned images are then used to count all of the seeds found on that specific seed-head. Specifically, the seeds are counted in reference to their category (top, middle, bottom, or other), which can be combined for a total count value. As a result, we are able to compare the sizes of the seed-heads, based on achene count.
‘Till next time folks,
Nicolette McManus
Howdy Flog Followers,
I spent the past two weeks diving into the initial process for the ‘Extremes Project’: cleaning as many seed-heads as I can get my hands on. I’m sure that all of you seasoned flog followers are familiar with this process. To clarify, cleaning a seed-head consists of extracting all of the achenes. An achene is a white ‘case’ that contains the seeds (seen under the magnifying glass in the photo below). There is a range of 50 – 400 achenes found in a single seed-head. However, specifically for the extremes project, it is important to extract the achenes based off of their location on the seed-head: top, middle, and bottom.
Top, Middle, Bottom, Other, Chaff. There are five separate envelopes that need to be filled for the Extreme extractions. I have been able to develop a method of satisfying all the categories as precisely as possible. First, I start by extracting a minimum of 30 achenes from the top, followed by at least 30 achenes from the bottom. However, the bottom is tricky because of the sterile ‘ray achenes’ found along the bottom edge of the seed-head. These ray achenes, along with unknown / runaway achenes are placed into the ‘Other; category. Then, all of the remaining achenes on the seed-head are put into the ‘Middle’ category. Lastly, all of the chaff, the leftover ‘flower guts’, is collected into its own category envelope.
The small seed-heads that I have encountered require an even more delicate approach than the others. This is based on the fact that they do not have a full 30 top nor full 30 bottom achenes that could be extracted individually. So, as a compromise, I would extract five achenes from the top and then five achenes from the bottom. While alternating, I would continue until I had a maximized amount of equal top and bottom achenes.
It has been an interesting experience working with the Extreme seed-heads. I have found lots of variation in the Extreme seed-heads. For instance, there is a great difference in sizes between all of the seed-heads. There was even a seed-head that did not have any achenes, zero. Additionally, there are more frequent occurrences of running into dead larvae and cat frass (caterpillar poop, that looks like a spiderweb-like structure) on the heads, which keeps things interesting.
Now, on to the next step: Scanning! This step allows for me to be able to count all of the seeds in all of the categories while also documenting everything digitally. Tune in next week for more details on Scanning.
The flowers on these heads bloom from the bottom to the top. We can use this information to gather at what point the flower was being fertilized by pollinators. For example, if only the bottom achenes are fertilized, then that tells us that the particular seed-head was an early-bloomer or was fertilized early in it’s blooming process. This is the reason why it is important to isolate the top, middle, and bottom achenes. Plus, isolating the achenes into these categories allows for data comparisons and individual interpretations down the road.
By the end of my analysis, I hope to use the data that I have collected to help the echinacea team find positive fertilization patterns for this plant, in order to help to conserve their populations.
 
‘Till next time!!
Nicolette McManus
Hello all you flog followers,
My name is Nicolette and I am a new student intern for The Echinacea Project team! I would like to introduce myself, as I will be posting along the way of my Echinacea journey. I am currently a sophomore at Northwestern University studying Environmental Science and Art Theory & Practice. I am super excited to be a part of a specific project here and I am intrigued to see the results!
I will be working on the “Extremes Project”. Essentially, this project will reveal the variations of seed fertilization among the ‘”extreme” plants. When I use the word “extreme”, I am referring to the echinacea plants who bloom earliest, latest, or are located at far distances away from other clusters of echinacea plants. We hope to use the data we collect in order to make sense of these patterns and further be able to help conserve this native prairie species.

I will begin extracting achenes from these “extreme” seed-heads today, and will keep you updated with the process and discoveries!
‘Till next time folks,
Nicolette McManus
|
|